Last Updated on: January 23th, 2020 by
The Complete WordPress & 000webhost Guide (2020)
WordPress definitely doesn’t require any formal introduction, since it's the most popular blogging platform that quickly made a place of its own in the hearts of every webmaster.
However, if you’re a novice and want to make yourself affluent with various nuances of web development, it is essential to mention that WordPress started out in 2003. It was launched as a way to make it easier to add content to websites without needing to know any code. Yes, that’s right, you don’t need to know any code in order to create a website with WordPress! And in this step by step WordPress tutorial we will show how easy it is to create one!
Since then, WordPress has evolved to the largest self-hosting website creation tool in the world, used on millions of sites and seen by tens of millions of people every day. Today, around 74.6 million websites depend on WordPress.
So what is the reason for such an ever increasing popularity of WordPress?
- WordPress is an open source software, which means that it can be freely used, changed or modified by anyone.
- Although WordPress started out as a blogging system, it has now one of the most powerful content management systems. WordPress allows you to add plugins, themes and widgets that can help you create any type of site you want: a business website, an online store or a membership site can be easily created with WordPress.
- It’s easy to learn because there are thousands of WordPress tutorials and guides covering every aspect of this CMS.
The fact that you do not need any coding knowledge to use WordPress is great. But if you ever decide to take a swing at it having a self-hosted WordPress website will allow you add your own PHP code, modify your theme by using CSS, make direct changes to your site by executing MySQL queries in the database and much more.
With that being said, by now you must be convinced that WordPress is the right choice for your website or blog. Without beating around the bush, let’s get started with the WordPress tutorial for 000webhost.
We also prepared a step-by-step WordPress video guide on how to make a free WordPress website on 000webhost.
However, if you need a more in-depth tutorial, continue reading below.
WordPress Tutorial Index
- Installing WordPress on 000webhost
- Managing a WordPress Website
- Accessing WordPress Dashboard
- Navigating in WordPress Dashboard
- Main WordPress Settings
- Posting Your First Post
- Using Categories And Tags
- Creating Page on WordPress
- Managing WordPress Comments
- Customizing WordPress Website
- Updating WordPress Site
- Backing Up WordPress Site
- Optimizing WordPress Performance
Installing WordPress on 000webhost
Installing WordPress on 000webhost is definitely the right way to go, since 000webhost is a user-friendly and free website hosting service - you won’t have to spend a dime on web hosting, which is very important when you are just starting with your website. And above all, setting up WordPress on 000webhost is simple and even a beginner can handle it efficiently. The easy-to-use interface makes the entire installation a smooth process. So, let’s see how you can do it.
The installation process can be completed either through the famous WordPress five-minute installer (see tutorial how to install WordPress manually) or through 000webhost auto-installer. Follow these instructions to install WordPress through auto-installer:
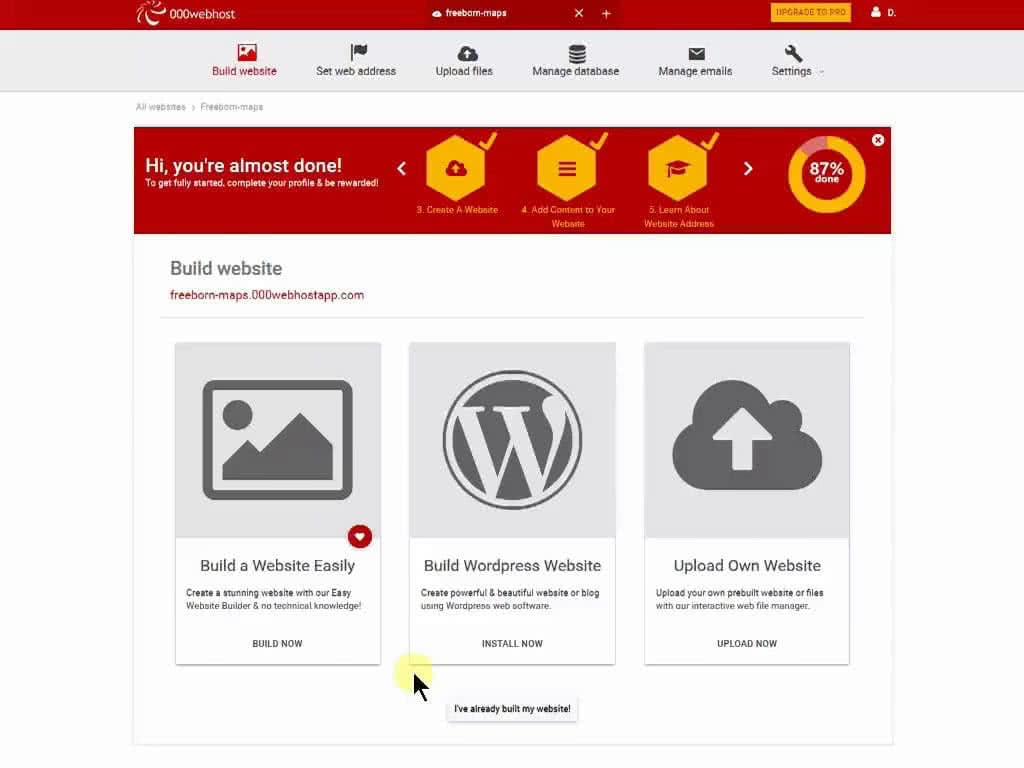
- Access your 000webhost app and click INSTALL NOW under Build WordPress Website.
- Click the Install button and the installation process will begin.
- Once the installation is completed, hit Go to WordPress configuration page button.
- Choose your language and press Continue.
- On the next screen enter the title of your site and the administrator details. Continue by clicking Install WordPress.
WordPress is now installed, and you can proceed with creation of your WordPress website.
Managing a WordPress Website
As you can see WordPress installation is a straightforward process. Especially on 000webhost! In the following WordPress tutorial section you will find out how to manage a WordPress website.
Accessing WordPress Dashboard
After the installation process is completed, you will be forwarded directly to WordPress administrator dashboard. Anytime later you will have to use one of the following URLs to access WordPress admin area:
- http://yoursite.com/wp-admin
- http://yoursite.com/wp-login.php
You will need to use WordPress administrator credentials you have entered during installation in order to access the dashboard.
If you forget the password, you may reset it by pressing the Lost your password? button.

Navigating in WordPress Dashboard
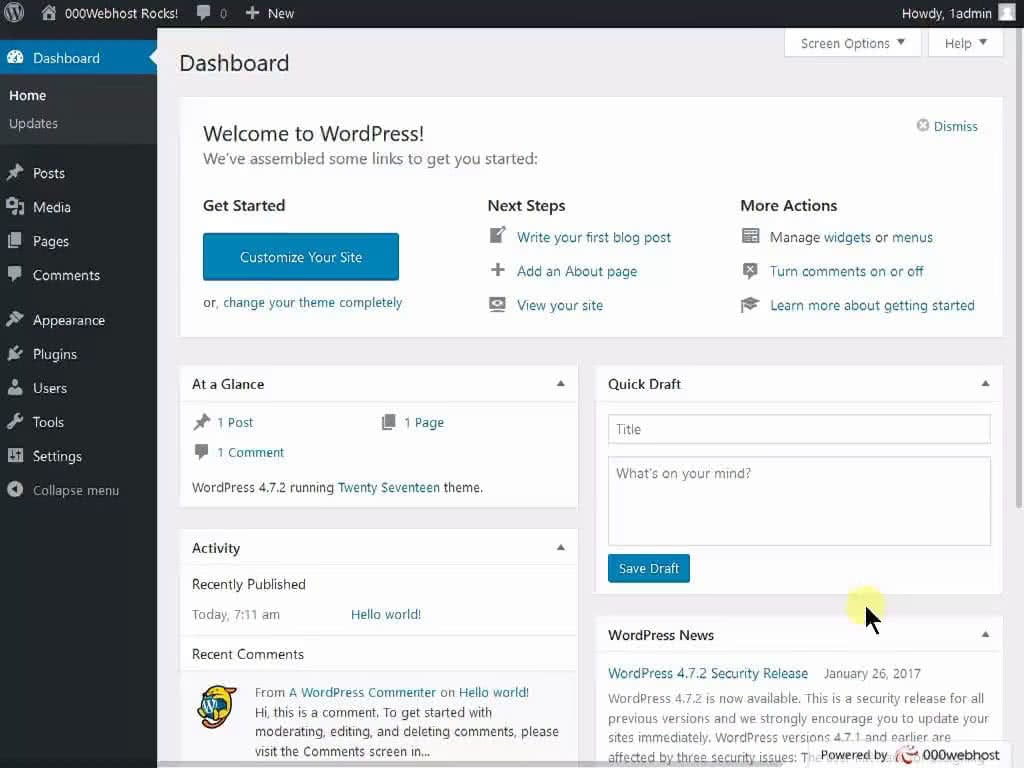
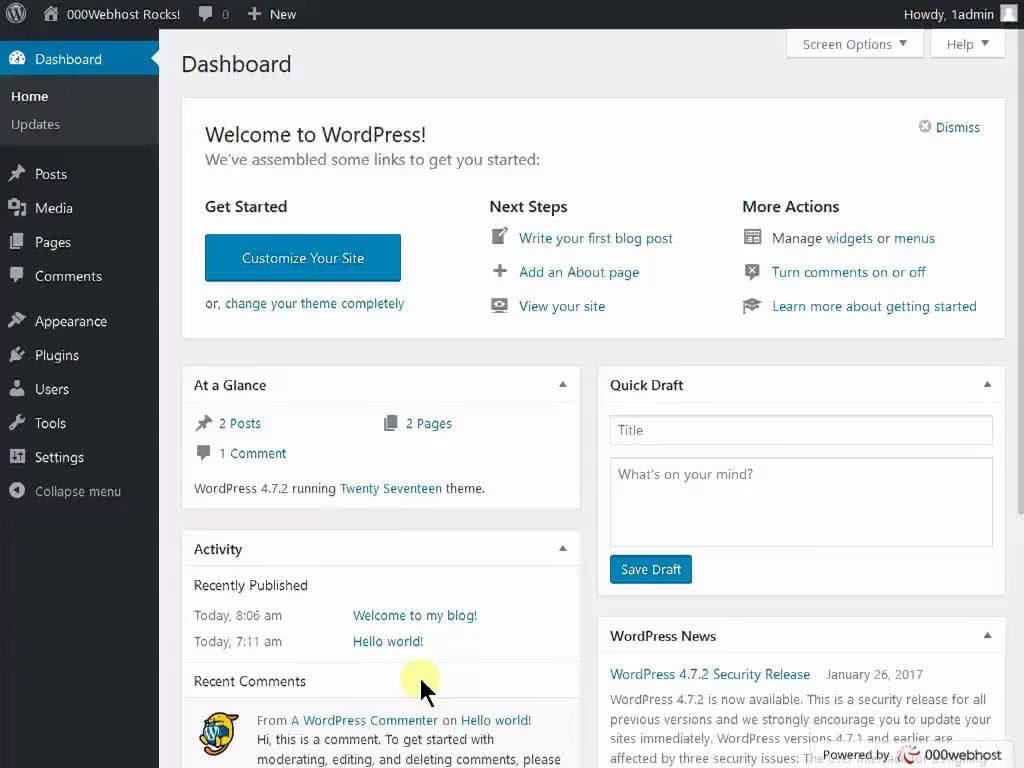
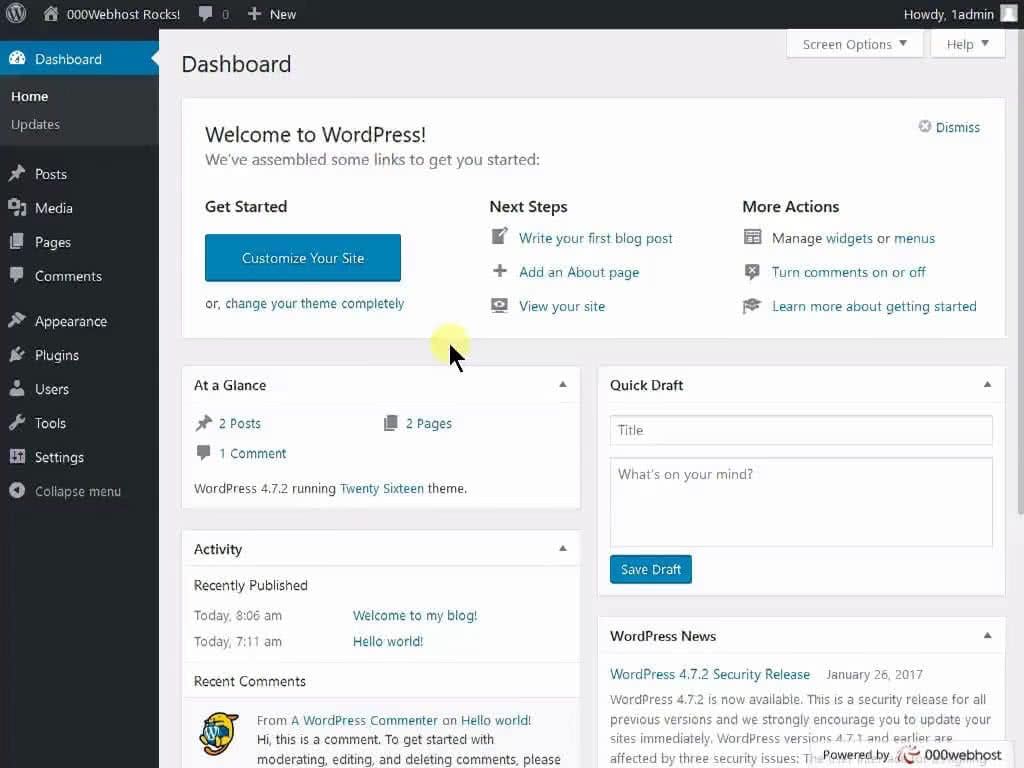
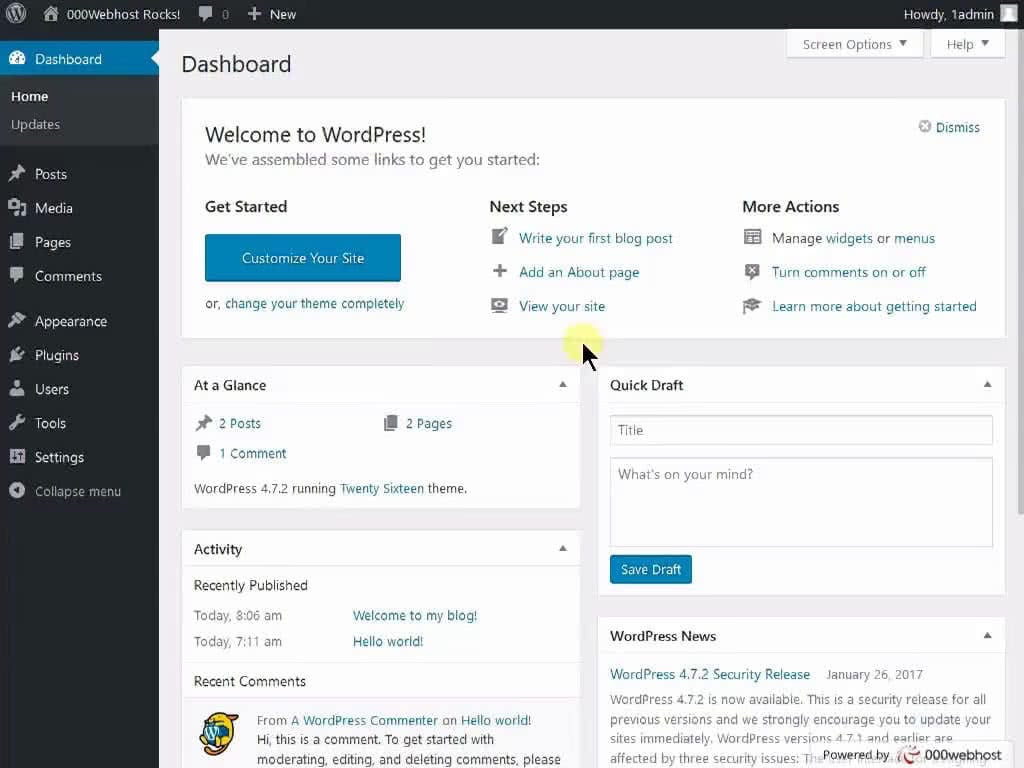
WordPress Dashboard is built to help you manage your site. You will find the Welcome to WordPress section at the top of the page. In this section, you can quickly access everything you need to start off with WordPress, like writing your first blog or adding an about page, or viewing your site, or managing widgets, comments, etc. If Welcome to WordPress is not there or you removed it unintentionally, go to Screen Options on your upper right-hand corner and then check Welcome.
You’ll find several other sections on the administrator home page:
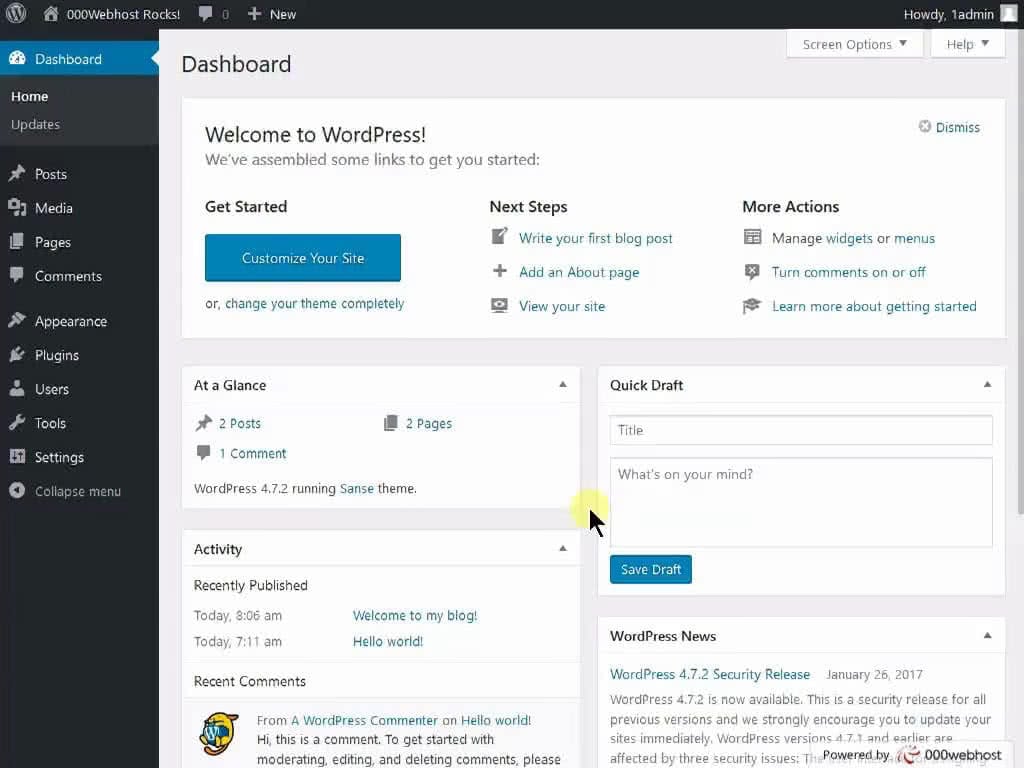
- At a Glance shows which theme you are running, the number of posts and pages you have and other recent activity.
- Another section is the Quick Draft to be used when you want to add a quick post. However, you will not get the various formatting features that you will get in the posts section but this is a quick way of creating a draft post.
- Activity box shows latest posts and comments.
- On WordPress News box you can see latest news related to WordPress.
Over on the left of your screen, you have the main navigation bar that you will use to get around your WordPress dashboard.
Main WordPress Settings
Let’s take a look at the basic settings you need to know to use your WordPress site. So when you go down to Settings on the navigation bar, you will find:
- General. Here you can change the main URL, the time zone, the title and the description of your website.
- Writing. On this section you can setup your default category and post format. Want to submit posts via email? Configure this feature here.
- Reading. Here you can choose what the front page looks like: whether it will show the latest post or a static page. You can also control how many blog pages are shown and whether your visitors will see the full post or just a summary.
- Discussion. In this section you can configure settings, related to comments. You can start by setting default comment settings.
- Media. In this section you can change the default image size and choose the way you want your files organized.
- Permalinks. Permalinks allow you to control the URL structure of your posts.
Posting Your First Post
One of the many benefits of WordPress is that it’s extremely easy to publish fresh content by adding new posts.
To create a new post, click the Add New button under the Posts section. You will find yourself on a content creator page which looks a lot like any word processor.
The content section comes in two tabs: the visual, and the text view. The visual view shows the text as it would appear on the finished page and the text view will show you the post in HTML format.
Right above the content section, there is a post editor toolbar which will help you format your post. It has a variety of features, for example: Bold (which would bold your text), italic (which would italicize your text), underline (which would underline the desired text), add media (where you can insert photos and videos in your post), HTML tags, text alignment and others.

On the right hand, you will find a Draft button that allows you to save your work and come back to it later. Next to the Draft button, there is a Preview button that shows you how the post will look on the blog when you’ll have published it.
Next, you can change the visibility of your post. The Public option allows you to stick the post on the front page. This section also allows you to schedule the post for later rather than publishing it immediately.
Moving down the page, you have a section that allows you to choose a Category and add Tags to your post.

PRO TIP
In order to reap SEO benefits from your post, it is essential that your post follows a certain standard structure, consisting of:
- Title.A title gives a sneak peek on what the article is all about to the readers. No matter how good the main body of the article is, if it doesn’t have an equally tempting title, it would remain deprived from any attention, which is the last thing you would want.
- Post format. This is the main body of the post where you will do the talking. It is highly recommended to format your post accordingly, by making proper use of H2 and H3 tags for maximum search engine visibility. Further, try to give subheads and pointers in the post to enhance its readability.
- Featured Image. Featured image or a post thumbnail is a representative image that comes next to your post. It is essential that you use a proper featured image with your posts. It would not only attract readers, but would also add to the aesthetic appeal of your website.
This is all you need to know to publish your post.
Using Categories And Tags
WordPress Categories allow you to arrange your posts by subjects to make your content easier to find. To add a new category, go to Posts and Categories:
- Click on Category.
- Name the category and add a Slug which is a shortened URL for your category. If you want, you can even add hierarchy to the category and put it under the parent category.
You can also add the WordPress tags in the same way. Click Tags on the Dashboard. Give a proper name and a slug, as you did for categories, in order to add a new tag.
There is a significant difference between WordPress categories and WordPress tags. WordPress categories are based on the fact that Categories help group your post with other similar posts, but Tags are used for creating groups that fit into multiple categories. Example: beauty is a category, while lips, eyes, hair form the tags. You’re getting the drift, right?
Creating Page on WordPress
Pages are designed for static content, even though you can change or update them whenever you like. To see the pages your site currently has, choose All pages from the navigation section.
You can add new pages by clicking on the Add New button under Pages section.
Adding a new page is very similar to adding a new post, except that you don’t have the option to use categories or tags for pages. However, pages can have parent pages. So, if you wish to have the page as a child of another page, you just need to indent the page column in the menu section and it will appear as a drop down menu item from the parent page.
You should take into account that a new page doesn’t get automatically added to the menu. To do that, you have to go to the Menu section and add the new page to the custom menu. The Menu can be found under Appearance in the navigation section of the Dashboard. You can add the page to the menu by checking the box on it and clicking Add to Menu.

WordPress Posts Vs. Pages
Care should be taken that a post is different from the page. Posts are nothing but your blog entries which you keep on entering from time to time and are listed on your blog in the reverse chronological order. On the other hand, relate pages to About Us and Contact Us pages of your website, which are static and created seldom. We will go into more detail for WordPress pages further below in our WordPress tutorial
Managing WordPress Comments
Each post has an area beneath it for visitors to leave their comments. This is what makes the posts interactive.
The Comments section on the dashboard allows you to approve, reply, edit, trash or spam a comment from the dashboard itself. The comment will appear live on the website beneath your post only when you approve it.

Customizing WordPress Website
One of the best parts of a WordPress website is the quickly customizable options that it provides you with on the go. Check out the rest of our WordPress guide to see the various ways you can customize a WordPress site.
Installing WordPress Themes
A theme allows you to control the look and design of your WordPress website including colors, page layout, and fonts. You can get a free theme or you can pay for a premium one. In our guide we will mainly focus on the free themes.
To manage WordPress themes, choose Appearance and Themes from the navigation section in your dashboard.
To install a new theme simply click the Add New button. It will take you to a directory of free themes. Use search or filters to find a theme you want to use. Once you have chosen the theme that you like, click on Preview button to see how it looks on your site. If you’re happy with the result, press Install button.
You can further customize your already installed theme with the help of a theme customization tool in WordPress. Simply click on Appearance in the left menu, and click on Customize. From there, you can customize the current theme as per your needs by changing site identity, colors, background image, menus, widgets and so on.
That’s all it takes to change the look of a WordPress website!
Installing WordPress Plugins
Plugins are extensions that can be installed on WordPress in order to extend its functionality and add new features to your website.
There are plugins for almost everything. From social media sharing to improving the security of your site to giving you data about how the people visit your site and search engine optimization.
To add a new plugin, click on the Add new button under Plugins section. Choose from Featured, Popular, Recommended, Favorites or enter keyword in the search field to find the plugin you want. To install the plugin, press Install Now and then Activate buttons.
The Upload Plugin button on top allows you to upload plugins that have been purchased.
Most plugins will give you a new item on your navigation menu: this is where you will control your plugin from.
PRO TIP
When choosing a plugin, it is best to check if it’s compatible with the latest WordPress version. This can be seen by checking the date it has been updated. Also, check how many ratings the plugin has. An out of date or a poor quality plugin may cause problems with your site.
Adding Widgets
Widgets allow you to change the layout and the content of your site simply and quickly.
Widgets can be accessed from the dashboard, under Appearance section.
You will see a list of available widgets. On the side, you have areas where you can place your widgets. By default you should have the Primary Sidebar, a Content Sidebar, and a Footer Widget Area. However, the number of widgets depends on the WordPress theme you are using.
To add a widget, you simply need to expand the area where you want the widget to be, drag and drop the widget there and click Save.
To remove a widget, simply click and drag it away from the widget area. If you want to add your own text to a widget, choose a plain text widget and then put the text or HTML code in there.
Updating WordPress Site
WordPress handles small updates itself, so you don't have to worry about it. The larger ones will give you the option to update at your chosen time. Meanwhile you can look at the features of the update or put your site on maintenance mode.
There are three things you must always update on your WordPress site: WordPress itself, themes and plugins. You can update your site from the Update section in the navigation bar.
It is very important to keep your whole WordPress site up to date. That is because when a plugin or a theme is updated, you may get new functionalities and bug fixes. It is also a crucial part to keeping a WordPress website secure and fast.

Backing Up WordPress Site
Backing up your WordPress website means making sure that all of your data is kept safe in an alternative location. In the event of something going wrong with your WordPress site, a backup is a good way to ensure that all of your files can be restored to their original condition.
PRO TIP
Backup your website as often as possible in order to avoid any nasty surprises. Sometimes, when moving, deleting, or editing your WordPress files, you will notice an error or change on your website that can be very difficult and time-consuming to correct. That’s why backing up your WordPress website is so important.
Using WordPress Plugin
One of the best methods to backup your WordPress site is to use All-In-One WP Migration plugin which is pre-installed on 000webhost.
In order to create a backup of your WordPress, click the All-In-One WP Migration plugin that is visible on the WordPress Admin menu. The options Export, Import, and Backups will be available. Click Export to proceed to the Export Site screen, and then select the Export To button. You will then be asked to choose a location to save your newly exported WordPress files:
- File
- FTP
- DropBox
- Google Drive
- Amazon S3
- OneDrive
- Box

Choose the first option if you want to save backup files to your computer. The only thing left for you to do is click Download and you’re all done.
From this point on, you’ll be able to Import all of your safeguarded WordPress files and database onto your new or existing WordPress instance following almost identical steps. The only difference is, when you have successfully downloaded the All-In-One WP Migration plugin on your new website, be sure to select Import instead of Export. With barely any effort at all, you will be able to see all of your themes, images, text, plugins, widgets, and everything else exactly as you did before.
Using FTP and phpMyAdmin
There are more ways to create backup of your WordPress site. One way to backup your files in a safe and simple way is through an FTP client, like Filezilla or Cyberduck. This method is particularly useful if you cannot access your WordPress admin area.
Follow these steps, to backup your WordPress files using FTP:
- Enable FTP transfer option in 000webhost panel, General settings page.
- Copy FTP authentication details (host name and username) from the same General settings page.
- Open FTP client and connect to 000webhost server using above mentioned details.
- Right click on public_html folder and choose Download.

Keep in mind that due to the nature of FTP, it can take quite some time to download all website files.
While WordPress files are download, you can proceed and create a backup of WordPress database. On 000webhost it’s easy:
- While in 000webhost control panel, click on Manage Databases icon.
- Click on Manage -> phpMyAdmin for appropriate database.
- You will be redirected to phpMyAdmin.
- Click on Export tab.
- Click Go.

That’s it! Once all of your WordPress files are downloaded and the download of the SQL file is complete, you will have a full backup of your WordPress site.
Although FTP backups are considered a more hands on and manual way of backing up your WordPress site, compared to the All-In-One WP Migration export and import, it is a relatively easy way of duplicating your WordPress database and files to another location. In essence, all you have to do is download the files onto FTP client, and your WordPress site is saved.
Optimizing WordPress Performance
A slow WordPress is a bummer for any website owner. No visitor wants to wait for a page to take more than 3 seconds to load. Unfortunately, websites powered by WordPress tend to slow down with time, therefore, it’s important to give a lot of attention to WordPress performance optimization. In the following part of our WordPress tutorial, we will talk about the potential causes of slow WordPress website and provide a few tips on how to optimize WordPress.
If you are not a beginner, you would know a better way than checking your website’s speed from your own browser. Almost all of the modern browsers cache web-pages; cached websites are displayed almost instantly. This is why it’s recommended to use a tools like Google Pagespeed Insights or Pingdom to check the speed of your website. It also helps in checking website speed when accessed from different geographical locations. As already mentioned, it’s recommended for a website to take less than 3 seconds to load; if you are getting higher times, here are a few reasons why:
- Improperly configured WordPress hosting.
- Minimum or no caching.
- Bad plugins: poorly developed plugins can hurt your website speed exponentially.
- Overhead caused by external scripts: ads, font loaders etc. can also sometimes become an efficiency bottleneck.
Using WordPress Caching Plugins
Caching plugins are probably the easiest way to speed up WordPress. With 000webhost WordPress hosting however, you already have most of the work done for you. Two caching plugins are already installed on your WordPress:
- Page cache plugin. The page caching plugin saves the dynamically generated HTML files on the server via the cache whenever a request is received. This reduces the overhead of execution of database queries and the PHP code.
- Browser cache plugin This plugin reduces the server load by decreasing the amount of requests received per page. For instance, if you put the right file headers on static files (images, JavaScript, CSS etc.), the browsers can cache the files on the computer of the user. By implementing this technique, the browser will check whether the files have changed since last request and if not, it will just display cached versions instead of reloading everything from the server.
Although these plugins were created for Hostinger's WordPress hosting, they work flawlessly on 000webhost. You can find and control these plugins in your WordPress Admin control panel -> Plugins -> Must-Use section.

PRO TIP
If you have made changes for your WordPress site, but still see the the old version of the page, it’s possible that caching plugins display cached version instead of a new one. The very first thing you should do is clear cache. On our Page Cache plugin, it can be done by pressing the Purge Cache button.
There are other sophisticated plugins that also aid in the overall optimization of a WordPress website. Ones worth-mentioning are as follows.
W3 total cache
W3 total cache is exactly what its name suggests: a comprehensive caching solution for WordPress websites. It offers CSS and JS minification, object cache along with the database cache and page cache abilities.
Minification is the process by which unnecessary characters and blank spaces are removed from the source code without damaging the functionality.
You can turn on CSS and JavaScript minification in the General settings section of W3 Total Cache. To turn on minification simply check Enable box and hit Save all settings button.

If you need more control, advanced minification settings can be found on Minify section:
- Combine only does exactly what you think it does: it combines all the CSS files but doesn’t perform minification.
- Preserved comment removal only removes the comments from the combined files.
- Line break removal can be checked to remove line breaks present in the combined files
WP Super Cache
Just like its aforementioned compatriot, the WP Super Cache is also an excellent caching plugin choice. It can also fulfill all the caching needs of modern websites. After installation, you can turn caching on by going to Settings -> WP Super Cache. Here you can click on the Caching on radio button present in the Easy section, to turn on the caching or tweak any advanced settings.
Optimizing WordPress Images
Images can often play a part in making a WordPress website inefficient. It’s, therefore, very important to optimize images i.e. resize and compress them while retaining quality and making your website faster! A WordPress plugin WP Smush is very worth mentioning in this regard. After installing WP Smush, all of the pictures you upload in the future will already be compressed and optimized. Here are the exact steps you can use to optimize your existing images with it:
- From Media go to WP Smush.
- Scroll down and select Settings to tweak configuration according to your needs. You can smush 50 images at a time.
- Click on Update Settings and you are ready to go.
- Hit the Bulk smush button.

Best Practices
Keeping your WordPress website optimized should be an ongoing process; here are a few best practices to always keep in mind:
- Use Lightweight WordPress theme. Always make use of lightweight WordPress themes because most of the overloaded themes can make the whole website slow down.
- Keep WordPress updated. WordPress is updated frequently; make sure that your website always has the latest version installed.
- Split comments into separate pages. Receiving comments is always a big yes-yes! But if your post has too many comments then it can become a loading hazard. A great way to preserve efficiency is by going to Settings -> Discussion. Here check the Break comments into pages box.
- Remove unused themes and plugins. If you have any unused themes and plugins installed on your WordPress, remove them. You don’t want that junk to reside on your hosting account and slow down WordPress.
In conclusion
WordPress is a very user-friendly and interactive way to host your website. And our WordPress tutorial showed how easy it is to install this CMS on 000webhost. One of the reasons why WordPress gained such massive popularity was its ability to customize and edit, as per the needs directly from the backend without hiring any professional or writing single line of code. Some WordPress features are so easy to grasp that they do not even need to be included in this 000webhost WordPress guide.
But, that’s not just about it. You can integrate your WordPress website with social media, and other third party APIs to further enhance its functionality. You can even add Google custom search engine and other related functions to it. That being said, one thing is for sure - with a few tips and tricks, a lot can be done using WordPress. On the same lines, we hope that this WordPress tutorial has helped you in creating your WordPress website on 000webhost.
Want to learn more about WordPress? See Hostinger’s WordPress tutorial which cover WordPress from A to Z.
Just getting started? Grab our Free Hosting
000Webhost Free Web Hosting plan is great for starting or even medium projects. You'll get absolutely great features with zero costs! Your account will be activated instantly just in few clicks and you'll be able to build your website like a PRO without any technical or code knowledge!